Shooting Sticks:
A Guide For The Unwary
by Peter Lang
In many situations in African hunting, shots are taken from the standing position and on your safari, you will be offered the opportunity to use a set of shooting sticks, probably in the form of a tripod but occasionally a bipod.
The tripod usually consists of three lengths of wood joined near the top with a section of tyre inner tube or some such similar. The bipod is just two sticks similarly joined. Whilst you may be of the opinion that you don't need such assistance - you are 'bwana wa safari' after all and it's your decision - remember that if you wound and do not subsequently collect the animal, you still have to pay for it. Besides no true sportsman wants to leave wounded game and, particularly in the case of dangerous game, a wounded animal is likely to kill someone and that someone could be you! After all, you don't want to miss, or worse, wound, something that might decide to take exception to being shot, do you? So, a word to the wise - use the shooting sticks offered by your PH. You'll not be carrying the sticks, they will be carried by either your tracker or sometimes, your PH and he will set them up in front of you. This is the signal for you to play your part in the hunt, so be ready and know what to do next.
Now, let's not get hypertensive about this business - it's very simple and only requires a modicum of common sense and a little practice to turn it into a habit.
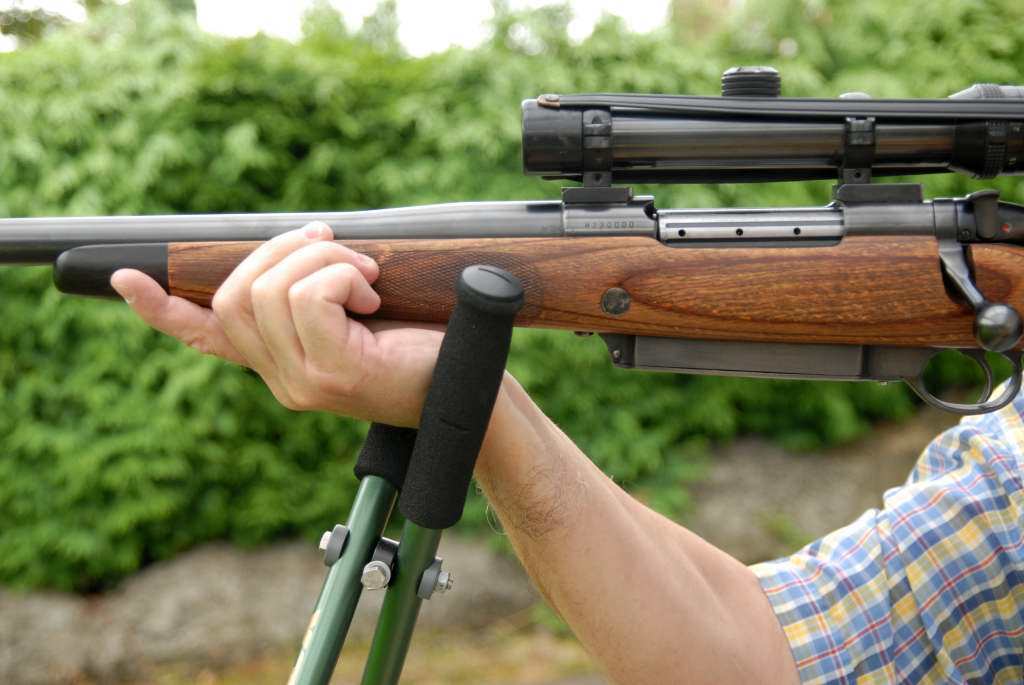
There is one very simple rule - the shooting stick is there as a rest for your front hand - not your rifle. This may run counter to what you've heard or seen but read on and see why.
Everyone knows that when zeroing, no part of the rifle, wood or metal, should rest or touch anything solid, such as a tree, fence post, bonnet (hood), bench, etc. You will, I'm sure, be fully aware that if that does happen, the shot may go high or otherwise astray. This is, obviously, because the rifle will recoil in a different manner when rested on a solid support from that when its support is soft or yielding such as sandbags or your hand. Likewise, resting the rifle in the fork of a shooting stick could throw your shots off, no matter how good or careful you are. And this is simply because the shooting stick, to all intents and purposes, approximates to a rest and can change the characteristics of the weapon harmonics and possibly the point of impact. It may or may not make any difference at short distances but might cause a miss at long range. Anyway, why take the chance?
Sticks come in three flavours - monopod, bipod and tripod.
Firstly, the monopod which is just a simple, single stick.
My deerstalking mentor, one of the best and most experienced lowland stalkers in Britain, sadly long since deceased, insisted on the use of a shooting stick - in this case, a single stick, a monopod. The stick, (around 18mm or 3/4" thickness), about eyebrow height, can be of any material your little heart desires, as long as it's light. Wood is preferable as it's reasonably quiet if inadvertently knocked on brush, stones, trees, boots, riflestock or the ground. Use metal if you wish but remember the 'ting' factor if you should hit something inadvertently. Such noises are alien and may alert or spook your quarry.
To use your monopod, first adopt your usual offhand shooting stance, with your stick in your left hand, if right-handed. Hold the stick near the top and grasp it using fingers two, three and four, leaving the thumb and index finger available to rest the forend of your rifle. Grasp rifle and stick together if you wish but doing so can be uncomfortable and sometimes makes a firm grip difficult to achieve.
Now, lean forward very slightly from the waist onto the stick with your arm straight and locked or very slightly bent, resting the rifle onto your thumb/index finger "rest". Your index finger will be between the rifle forend and the stick. Your hand position on the rifle fore-end should be where it would be normally. To adjust your aim, relax your grip on the stick and slide your hand up or down as required. Simple. You may find that a straight arm and locked elbow will improve your steadiness.
The monopod setup is very quick to put into action and, after a very little practice, a reasonably steady shot can be taken. It is used by deerstalkers in the UK and on the European continent. You will not usually encounter the monopod in Africa, but is a useful skill to acquire if the usual tripod setup is unavailable for some reason but a convenient tree is available.
Second up, the bipod which is just two sticks, or two monopods.
Now, I'm not talking about those bipods attached to the fore-end. This bipod is just two sticks attached near the top which when opened form a 'V' in which your hand/wrist can be rested. Two lengths of wood or other suitable material, of diameter and length as above, joined by means of a flexible joint such as a nut and bolt, a section of inner tube, vacuum cleaner band, etc. Once again, adopt your usual offhand stance and place the opened bipod in front of you just where your front hand will be. If necessary, push the feet into the ground a little. Shoulder the rifle and rest your forward hand or wrist in the 'V' so presented. I emphasise, rest your hand or wrist in the 'V'. Do not allow any part of the rifle to touch the rest. Once again, lean slightly on the rest. You can make a nice, steady shot this way. If the rest is too high or low, you only need to step back or forward a little to adjust by sloping the bipod either toward you or into a slightly more vertical position. Be careful to not to lean too much, however, putting excessive pressure on the 'V' may cause one of the legs to leave the ground, destabilising your setup.
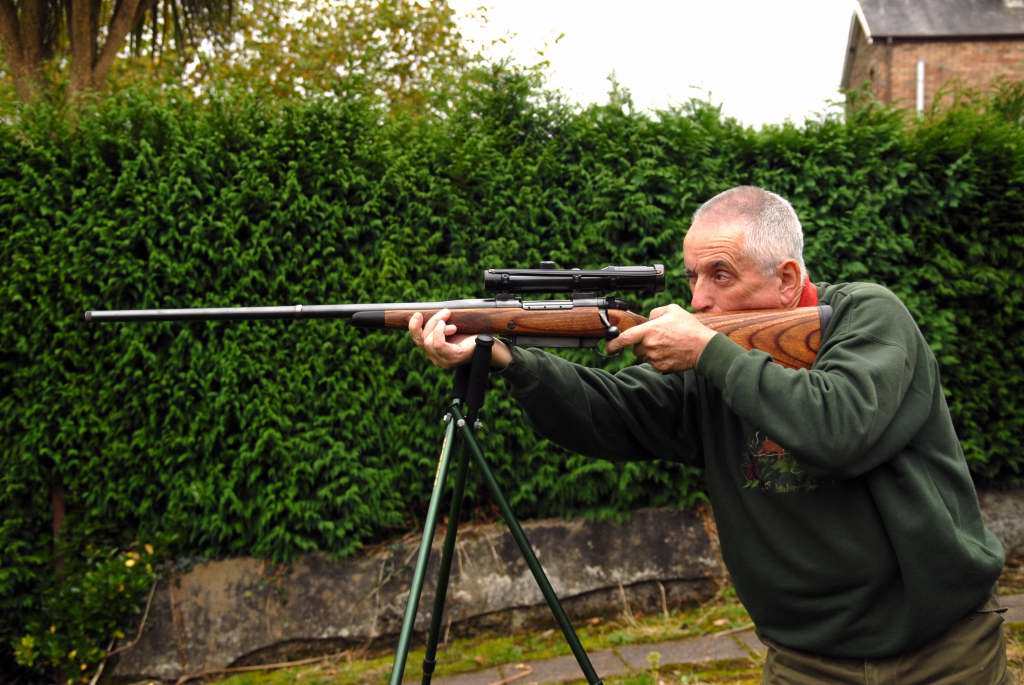
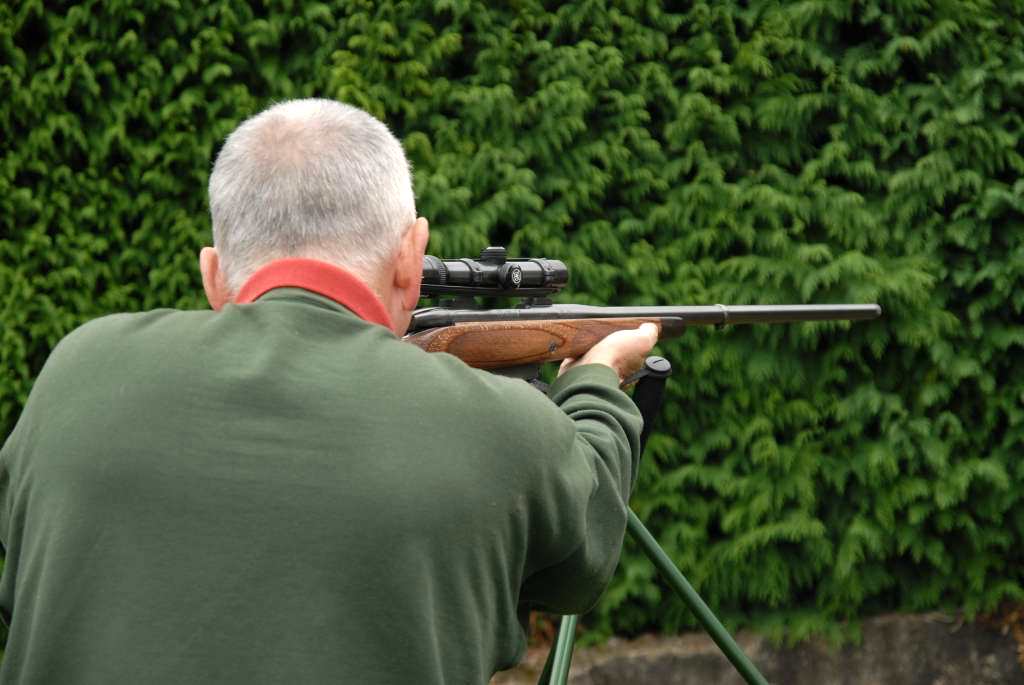
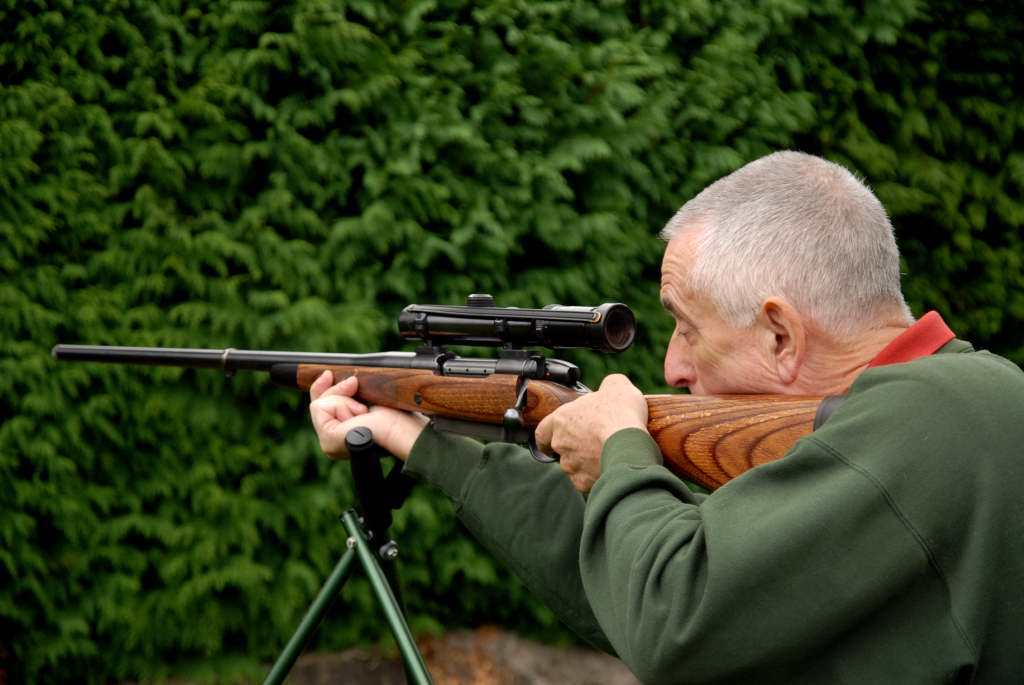
Finally, the tripod which is three sticks.
The steadiest of all and normally found in an African hunting context. You will not usually carry the tripod, your tracker, or maybe your PH, will do so and set it up in front of you prior to shooting.
Technique for the tripod is the same as for the bipod but there are two things to bear in mind...
Firstly and most importantly, the tripod should be set up with two legs facing forward toward the target and one facing back. This is the most stable arrangement. For those of a mathematical bent, work out the vectors involved. In other words, it's a bipod with an extra leg at the back.
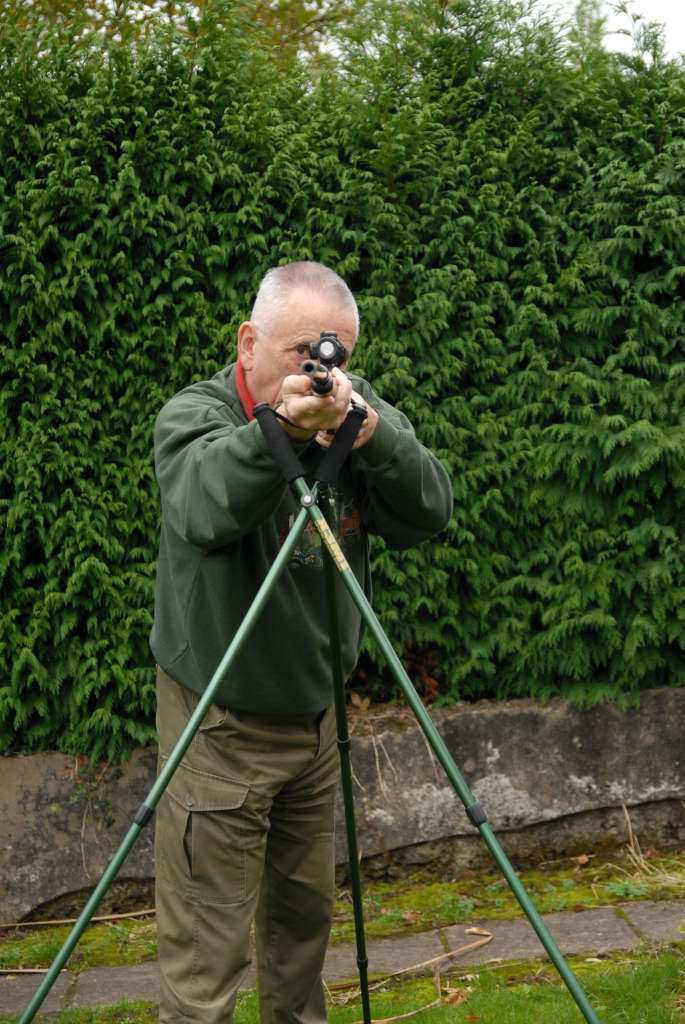
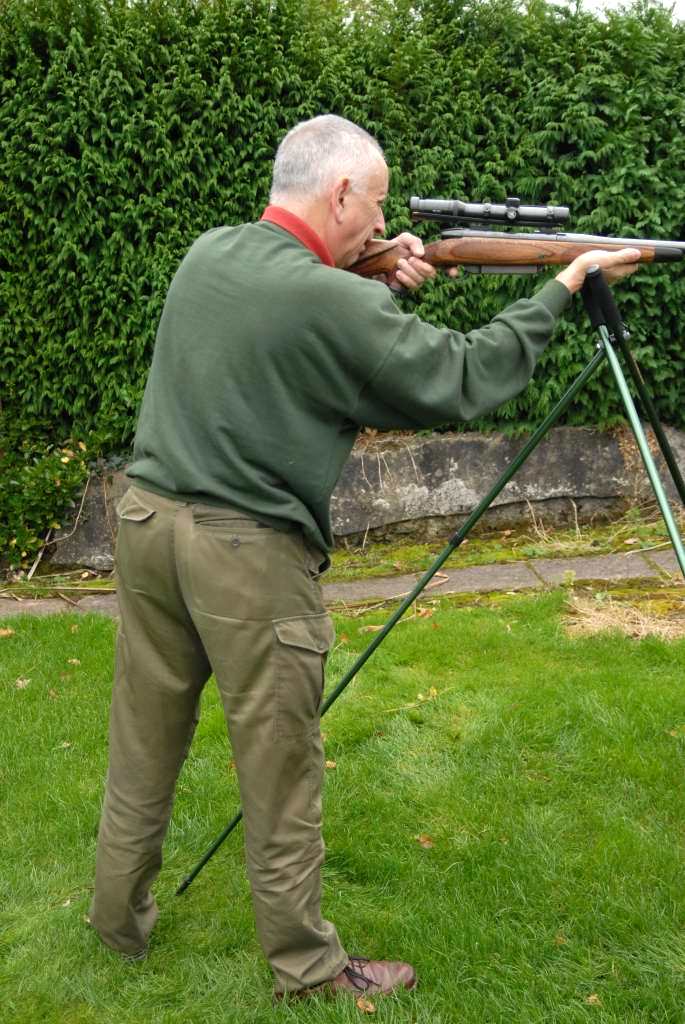
Secondly, adjustment for height is not as simple as for the other two and some shuffling may be needed although your tracker will usually set it up correctly. If necessary you can pull or push the rearmost single leg with your foot.
As previously, acquire your usual offhand shooting position, rest your forward hand or wrist in or on the 'V', as before, holding the rifle fore-end as normal. The previous caution applies - do not push down hard on the rest, just firmly.
Your shot will be very steady indeed and only lateral body movement will cause any wobbles. Again, you may find a straight arm and locked elbow to be steadier.
Make Yourself A Tripod
So as to be able to practice before your safari, it is quite simple to make your own tripod. It can be as elaborate or as simple as you wish. Materials needed are 3 lengths of bamboo cane and a very strong rubber band such as those sold for carpet cleaners. The same sort of bamboo canes joined about 6" from the top by a small nut and bolt for the two front legs and a small hinge to take the rear leg. Attach the rear leg at the top so that the 'V' formed by the front sticks is unobstructed. Dowelling can also be used, as can those plastic plant stakes found in garden supply centres. Don't buy a tripod, you'll not need to take it to Africa. Your PH will have one and it'll work as well as anything store-bought. During the hunt, the rest will be carried by your tracker and he will set it up in front of you, so you don't really need to bother with that aspect, although you may find it beneficial to do so during your pre-safari practice.
Dry Practice
Practice at home with an unloaded rifle until you can set up the tripod and get into a shooting position quickly and smoothly. Practice adjusting for height by moving the rear leg with your feet. If you practice setting up the tripod yourself and acquiring your shooting position, youll find that when it happens for real with that 40" buffalo in sight, you'll know what to expect. During this phase, remember also to practice safety, making sure that, in acquiring these new skills, you do not also acquire unsafe or bad habits. Remember to only disengage the safety when the rifle is on the rest and you have acquired your shooting stance, just as you would when shooting offhand.
Range Practice
Having got the hang of the "dry" practice, take your deer rifle (and your African rifle, if you wish), along with plenty of ammo and your tripod and head for the range. Start off with the deer rifle, the one that you've shot many times and practice a few runs with live ammo. If you don't have a deer rifle, your favourite rimfire will be just as good. See what sort of groups you can achieve - you may be surprised. Shoot at varying distances from say 25 to 200 yards. Once you've become familiar using your deer/rimfire rifle, change to your safari rifle.
You could, if you wish, practice kneeling and sitting with the tripod, using one of the legs as a rest as if you are using a monopod, as above.
Above all, practice, practice, practice.
That's all there is to it, really. Enjoy your safari, Bwana
Peter Lang
.Shooting Sticks Photographic Demonstration
More On Shooting Sticks
- Home >
- African Hunting Articles >
- Shooting Sticks: A Guide For The Unwary
Page Updated: Mar 2024

Shakari Connection Bookshelf
Browse the Bookshelf mini-site for thousands of African hunting books and much more....

African Hunting Countries
- Hunting Benin Benin Travel
- Hunting Botswana Botswana Travel
- Hunting Burkina Faso Burkina Faso Travel
- Hunting Cameroon Cameroon Travel
- Hunting Central African Republic Central African Republic Travel
- Hunting Ethiopia Ethiopia Travel
- Hunting Mozambique Mozambique Travel
- Hunting Namibia Namibia Travel
- Hunting South Africa South Africa Travel
- Hunting Tanzania Tanzania Travel
- Hunting Uganda Uganda Travel
- Hunting Zambia Zambia Travel
- Hunting Zimbabwe Zimbabwe Travel
Hunting Gear For Africa
- Cartridge Belts
- Ammo Holders
- Flashlights / Torches
- Headlamps
- Other Light Gadgets
- Hearing Protectors
- Gaiters
- Personal Water Bottles
- Hydration Backpacks
European Hunting
African Hunter Magazine
African Game Animals
Miscellaneous Hunting Topics
- African Hunt Packing List
- Hunt Preparation Checklist
- African Trophy Photography
- African Hunting Seasons
- Weather In Africa
- African Moonlight
- Your African Hunt Stories
African Wildlife Art
Create Your Own Website

Affiliate Disclosure
Shakari Connection is a participant in the Amazon Services LLC Associates Program, an affiliate advertising program designed to provide a means for sites to earn advertising fees by advertising and linking to amazon.com
Visitors' Favourite Pages
|
|

|
|

|
| Double Rifles | Baboon Hunting | Safari Hats | Insect Repellents For Africa | African Hunter Shot Placement |

Copyright © 2008-2024. All rights reserved. No part of this website may be reproduced for publication without written permission.